Intro
Configuring Nginx as a reverse proxy to allow access to application servers that would otherwise only be available locally or should be accessible only from locally. A reverse proxy serves as an intermediary between clients and backend servers, enhancing security by hiding server identities and filtering traffic. Key benefits include improved performance through caching and compression, efficient traffic distribution via load balancing to prevent server overload, and SSL/TLS encryption offloading.
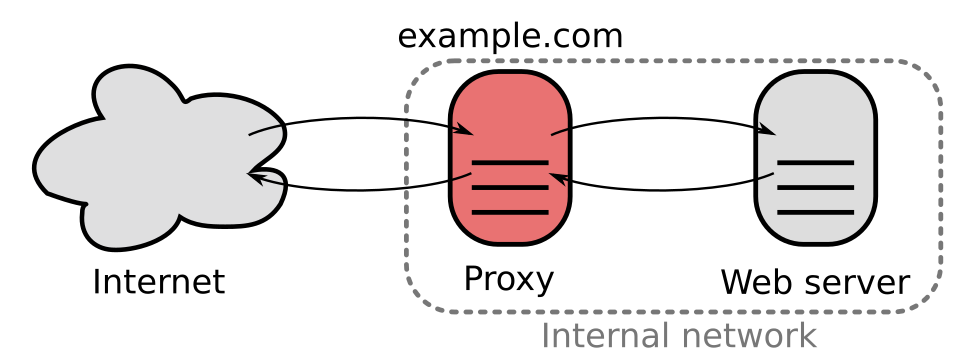
Do you remember Traefik from the first year? That was a loadbalancer and reverse proxy. Nginx is a web server but it can also be used as a reverse proxy and load balancer.
So why we need to reverse proxy?!? When working with Docker or containers you should need a reverse proxy to route traffic to container. Yes yes you can play around with ports and localhost namespace but you will have a problem with security and usability.
You should be using use localhost:port:port in docker settings when you are the only person using the service. https://docs.docker.com/engine/network/port-publishing/ .
0 Basic example of Docker compose that have network settings "too open"
services:
    web:
        image: nginx
        volumes:
        - ./templates:/etc/nginx/templates
        ports:
        - "8080:80"   #<-- this is the port you will use to access the service. Do you see network settings? Other way to write its is "*:8080:80"
        environment:
        - NGINX_HOST=foobar.com
        - NGINX_PORT=80
Better way to do this is to use reverse proxy and only expose the reverse proxy to the public and then let the reverse proxy route traffic to the container. This way you can have nice domain names and you can use SSL/TLS encryption, Fail2ban type of protection and so on.
services:
    web:
        image: nginx
        volumes:
        - ./templates:/etc/nginx/templates
        ports:
        - "127.0.0.1:8080:80"   #<-- Better!
        environment:
        - NGINX_HOST=foobar.com
        - NGINX_PORT=80
Step 1 - Creating a new server block
It is recommended to create a custom configuration file for new server block additions. A new server block (Server Block) is created for the domain name testproxy.local
Add the script below to the created file. Since there is no application server to be tested in the training environment, the ip address 127.0.0.1:8000 is used as the proxy_pass server because the Gunicorn application server will be installed on the NGINX server later.server {
listen 80;
listen [::]:80;
server_name testproxy.local www.testproxy.local;
location / {
proxy_pass http://127.0.0.1:8000;
include proxy_params;
}
}
This configuration file starts with a standard Nginx configuration where Nginx listens on port 80 and responds to requests made by testproxy.local and www.testproxy.local domains. The reverse proxy functionality is enabled through Nginx's proxy_pass directive. With this configuration, navigating to testproxy.local in a local web browser is the same as opening app_server_address on a remote machine. Although only one application server is configured here, Nginx can act as a proxy for multiple servers at the same time. By adding more location blocks, if necessary, several application servers can be connected through a proxy server into one unified web application.
All HTTP requests contain headers that contain information about the client that sent the request. This includes information such as IP address, cache settings, cookie tracking, authorization status and more. Nginx provides some recommended header forwarding options that you add to proxy_params and the details can be found in /etc/nginx/proxy_params:
With the help of reverse proxies, the goal is to convey essential information about the customer and sometimes information about the reverse proxy itself. In some cases, the proxy would like to know which reverse proxy handled the request, but usually the important information comes from the original client's request. To forward these headers and make the information available where it is expected, Nginx uses the proxy_set_header directive.
When Nginx acts as a reverse proxy, by default it modifies the two headers, removes any empty headers, and then forwards the request. The two changed headers are the Host and Connection header.
Here are the headers passed by proxy_params and the variables where it stores the data:
Host
This header contains the original host requested by the client, which is the website's domain name and port. Nginx stores this in the $http_host variable.
X-Forwarded-For
This header contains the IP address of the client that sent the original request. It can also contain a list of IP addresses, with the original client IP coming first, and then a list of all reverse proxies that have passed the request through. Nginx stores this in the $proxy_add_x_forwarded_for variable.
X-Real-IP
This header always contains one IP address belonging to the remote client. This is in contrast to the similar X-Forwarded-For, which can contain a list of addresses. If X-Forwarded-For is not present, it is the same as X-Real-IP.
X-Forwarded-Proto
This header contains the protocol used by the originating client to establish the connection, whether HTTP or HTTPS. Nginx stores this in the $scheme variable.
Let's enable the settings file by creating a link from it to the directory that supports sites, which Nginx reads at startup:
Let's test that there are no syntax errors in any of the Nginx files:
If there are no problems, restart Nginx to apply the changes:Nginx is now configured as a reverse proxy for the application server at 127.0.0.1:8000
Let's continue by creating a Gunicorn application server and a simple test application there.
Step 3 — Testing the functionality of Reverse Proxy using the Gunicorn application server
Gunicorn is a Python WSGI server that is often bundled with the Nginx reverse proxy.
Let's update the apt archive directory and install gunicorn:
There would also be an option to install Gunicorn via pip with PyPI to the latest version that can be plugged into the Python virtual environment, but apt is used here as a quick test platform.
Next, let's write the test.py Python function to return "Hello World!" As an HTTP response.
Enter the following Python code in the file:This is the minimum code that Gunicorn needs to initiate an HTTP response that produces a string of text to the web browser. After checking the code, save and close the file.
Let's start the Gunicorn server by configuring the Python test module and the application function inside it. Server startup takes over the terminal:
The result confirms that Gunicorn is listening on the default address http://127.0.0.1:8000. This is the address previously specified in the Nginx configuration for the proxy server. If you see error messages on the screen, go back to the /etc/nginx/sites-available/testproxy.local file and edit the app_server_address associated with the proxy_pass directive.On the Demo-Ubuntu workstation, open a web browser and go to testproxy.local:
Tip
Did you remmber to add testproxy.local to the hosts file :D ? No? So do it now and try again.