| Meaning | Password |
|---|---|
| Username for the database | dbadmin |
| Database phpmyadmin password | root007-jsFcTe4u27FGZe4KpeYff |
| Database admin password | root007-jsFcTe4u27FGZe4KpeYff |
| ----------- | ----------- |
| Database name | wordpress |
| Database username | wordpress |
| Database password | wordpress007-jsFcTe4u27FGZe4KpeYff |
| Database server | localhost |
| ----------- | ----------- |
| Wordpress username | student |
| Wordpress Password | root007-jsFcTe4u27FGZe4KpeYff |
| ----------- | ----------- |
| Nextcloud username | student |
| Nextcloud Password | Read it from Mysql |
Backup Commands and a backup user
First, we will practice logging in with a password, then we will move on to logging in with a certificate, which is the modern defacto way of logging in
We create new user backupuser to whom we grant rights to backup.
Add user backupuser to sudo group. ONLY IN LAB!
You can modify the sudo rights for the backupuser with the usermod command. Normally this is a really bad idea because we want to limit the user's rights and not increase it!!! Excellent instructions for making a user for single task (https://sleeplessbeastie.eu/2023/01/06/how-to-install-tailscale-derp-server/)
We will be using this a backdoor to get back to machine if something happens to your Google account
SSH server PasswordAuthentication and AllowUsers
Google machines have multiple files there you can add SSH information. Read the main config file and and accordingly edit needed files. Main config file will read all *.conf files inside of sshd_config.d folder.
sudo nano /etc/ssh/sshd_config
sudo nano /etc/ssh/sshd_config.d/50-cloudimg-settings.conf
sudo nano /etc/ssh/sshd_config.d/60-cloudimg-settings.conf
PasswordAuthentication yes
AllowUsers tkeso backupuser ijustcopyanddonotthink #Note! You don't need to do this! Just understand this! When done correctly it will make your server more secure, but you can log yourself out of systems :)

#Note2! Add tkeso to your computer that i can easily log in.
Save changes CTRL + O Enter
How to recover from SSH not working
1) We need to inject new SSH config file https://cloud.google.com/compute/docs/instances/startup-scripts/linux#expandable-1
2) Use this code
echo "#We did move all changes to 50-cloudimg-settings.conf" /etc/ssh/sshd_config.d/60-cloudimg-settings.conf
echo "UseDNS no" > /etc/ssh/sshd_config.d/50-cloudimg-settings.conf
echo "PasswordAuthentication yes" >> /etc/ssh/sshd_config.d/50-cloudimg-settings.conf
echo "ClientAliveInterval 120" >> /etc/ssh/sshd_config.d/50-cloudimg-settings.conf
service ssh restart
----> After that, you can log in to the computer with your new user.
Key generation for backupuser
Make sure that you are logged in with backupuser. We will generate keys for the new user
cd /home/backupuser

ssh-keygen -t rsa
#OR
ssh-keygen -t rsa -b 4096
#OR
ssh-keygen -t ed25519 -C "your_email@example.com"
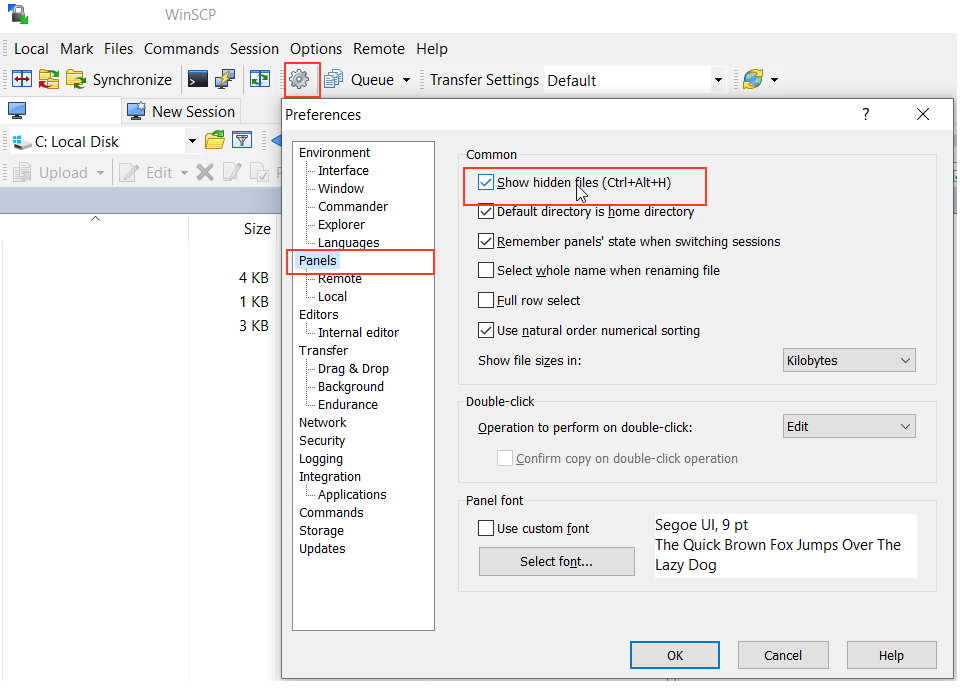
WinSCP, Making hidden files visible Select Options →Preferences → Panels tab → Show hidden files (Ctrl+Alt+H).
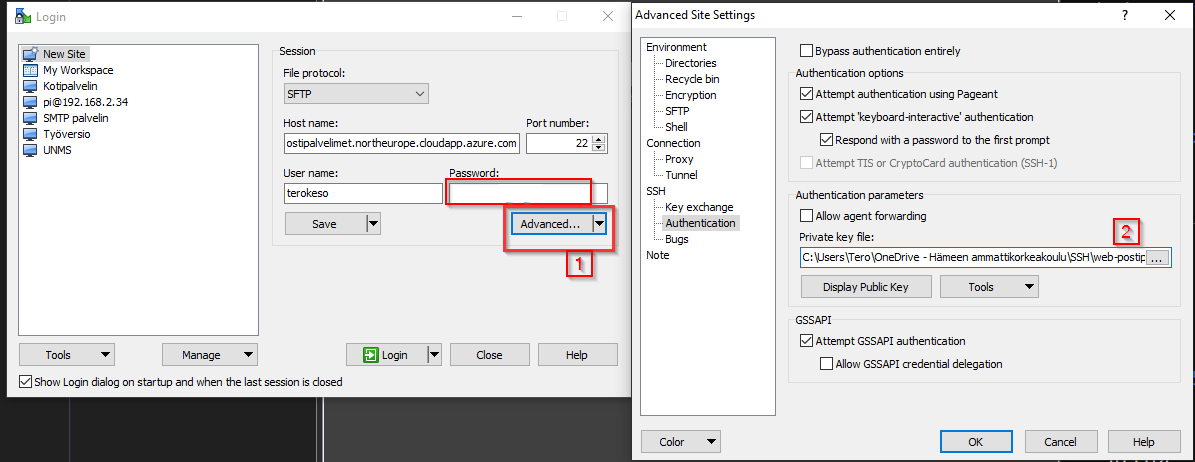
WinSCP, Login with a certificate
Fill in the Username→ Advance → Authentication → Private Key File
Key transfer to own machine where they were created. There's a handy tool called ssh-copy-id for key transfer. This transfers that user's public key to the contacting machine. After that, you can connect (if the configuration allows) with the private key. The keys are stored in ~/.ssh/authorized_keys
Use the tool to transfer the newly created keys to your computer.
NOTE!!!! Copy to localhost will not work in Google cloud Ubuntu 22.04 image, but will work on older 20.04 image. Because... I don't know :)
Transferring the key from the Tero machine to the target machine. Check the correct IP on the Moodle homepage
ORTransferring keys on a Windows machine with a terminal (FYI)
cat ~/.ssh/id_rsa.pub | ssh username@remote_host "mkdir -p ~/.ssh && touch ~/.ssh/authorized_keys && chmod -R go= ~/.ssh && cat >> ~/.ssh/authorized_keys"
Using Github as SSH public key storage (https://github.com/dustinkirkland/ssh-import-id)
Security practices
- Do you still need to use a password with SSH?
- Do you need to turn off password authentication?
- Is this a grading criteria in assignment 1? Yes :D
Let's do a backup with mysqldump
Recommended materials for understanding backuping
-
Backup and restore using CLI https://blog.devart.com/how-to-restore-mysql-database-from-backup.html
-
Phpmyadmin instructions https://support.reclaimhosting.com/hc/en-us/articles/4405266499991-phpMyAdmin-How-to-Import-or-Restore-a-Database-or-Table
-
Basic of tar command https://www.tutorialspoint.com/linux-tar-command
General code for backup Wordpress backup using mysqldump (https://css-tricks.com/back-wordpress-database)
Let's install mysqldump first
Basic syntac for mysqldump
Always remember to ensure the write access to the target folder either by going there with the cd command or use the home folder of the user ID. The backupuser folder is not in the cloud services, but you can edit your own username for it, e.g Terokeso.
Our system-specific example whe you running command using backupuser account
You can also pipe the output to a bzip2 file to compress it. This is useful if you have a large database and want to save space. The command below will compress the output and save it to a file called wp_backup.sql.bz2.mysqldump --no-tablespaces -u wordpress -p wordpress | bzip2 -c > /home/backupuser/wp_backup.sql.bz2
Mysqldump variables
The two most used command parameters are --single-transaction and --no-tablespaces
-
--single-transaction If the database is in use when the backup is performed, use --single-transaction. Taking a backup of a running database is always a risk, because changes may occur during the backup. A better way is to shut down the database and then run the copy. However, this causes a break in the service.
-
--no-tablespaces skip tablespaces, i.e. backing up the database environment configuration (https://docs.oracle.com/cd/B19306_01/server.102/b14220/physical.htm)
How to do a simple Wordpress backup https://wordpress.org/plugins/wp-db-backup/ & https://codex.wordpress.org/WordPress_Backups
SCP commands
CP practice (https://gist.github.com/TeroKeso/8077c222d60507d82ecca2af8eac7853)
Secure Copy (scp) (https://help.ubuntu.com/community/SSH/TransferFiles)
scp
SCP Movable Thing/ Where to move to
(Push)
(Pull)
scp backupuser@localhost:/home/backupuser/teron_backup_push.sql.bz2 /home/backupuser/wp_backup-etaalta.sql.bz2
Make backup more secure using SSL
Generating SSL Certificates for backup (https://www.digitalocean.com/community/tutorials/how-to-set-up-ssh-keys--2) / (https://help.ubuntu.com/community/SSH/OpenSSH/Keys)
A simple backup script
##
#!/bin/sh
PATH=/usr/sbin:/usr/bin:/sbin:/bin

mysqldump --no-tablespaces --add-drop-table -u wordpress -pwordpress007-jsFcTe4u27FGZe4KpeYff wordpress | bzip2 -c > /home/backupuser/wp_backup.sql.bz2
echo "Nightly Backup Successful: $(date)" >> /tmp/mybackup.log

##
Necessary commands to make the .sh file executable and secure
Crontab
Let's open a user-specific cron
Let's add new row
How would you make it so that scp automatically recovers the backups?
##
#!/bin/sh
PATH=/usr/sbin:/usr/bin:/sbin:/bin

mysqldump --no-tablespaces --add-drop-table -u wordpress -pwordpress007-jsFcTe4u27FGZe4KpeYff wordpress | bzip2 -c > /home/backupuser/wp_backup.sql.bz2

scp -i /home/backupuser/.ssh/id_rsa -P 22 /home/backupuser/wp_backup.sql.bz2 backupuser@34.88.246.198:/home/backupuser/backup.sql.bz2

echo "Nightly Backup Successful: $(date)" >> /tmp/mybackup.log

##
Mysql backup password protection
The backup mysqldump command, which uses a hard-coded password, is not in a place where a normal user can read it. This is an even more professional way https://www.serverlab.ca/tutorials/linux/database-servers/how-to-create-a-credential-file-for-mysql/ , because then the password is always hidden and cannot be detected elsewhere. This is an even more professional way
, because then the password is always hidden and cannot be detected elsewhere.
Example
General Backup examples for Linux
-
Complex :https://github.com/todiadiyatmo/bash-backup-rotation-script
-
Moderate :https://ubuntu.com/server/docs/backups-archive-rotation
-
Tero's home server backup with mysqldump and file backup :
#!/bin/bash
DATE=$(date +%d-%m-%Y)
BACKUP_DIR=/mnt/usb/backup
User=Username_what_you_want
# Disable exit on non 0
set +e


#Home
tar -zcvpf $BACKUP_DIR/home-$User-$DATE.tar.gz --exclude="/home/$User/.vscode-server/*" --exclude="*.local/lib*"  /home/$User

#etc
tar -zcvpf $BACKUP_DIR/etc-$DATE.tar.gz --exclude="/etc/pihole/*.db" /etc/

#root
tar -zcvpf $BACKUP_DIR/root-$DATE.tar.gz /root

#Docker_data
tar -zcvpf $BACKUP_DIR/dockerdata-$DATE.tar.gz --exclude="/dockerdata/webtop/.cache/*" /dockerdata

##database backup (mysql)

##This is not the best way to backup databases, but it works for me because I have only one database and user
#mysqldump --all-databases | bzip2 -c > /root/all_databases.sql.bz2

## Following command would better utilizes if you have multiple databases in separate files. Then replace all with *
#tar -zcvpf $BACKUP_DIR/databases-$DATE.tar.gz /root/all_databases.sql.bz2

#Remove old database backup from the primary location/disk
#rm /root/all_databases.sql.bz2

#Change ownership and permissions
chown root:root /mnt/usb/backup/*
chmod o-rwx /mnt/usb/backup/* -R

# Delete files older than 10 days #
find $BACKUP_DIR/* -mtime +10 -exec rm {} \;
Backup.sh error situation?
Check that the destination (folder or path) you are backing up to. The easiest way is to run just the first command
mysqldump --no-tablespaces --add-drop-table -u wordpress -pwordpress007-jsFcTe4u27FGZe4KpeYff wordpress | bzip2 -c > /home/backupuser/wp_backup.sql.bz2
If you don't find a problem in the first line, continue line by line until you find the error.
In some situations where you run .backup for the first time as sudo, /tmp/mybackup.log may appear with the wrong permission. To fix this, delete the files