Hardening of Own Server
SSH Hardening
At this point, we don't have any hardening yet (Fail2ban), so we turn off password-only login.
ORHardering Apache2
WordPress Hardening Layers (Assent of level of access and control)
flowchart TD
    A["<b>6. Application WP Addons</b><br/>WordPress security plugins WP setings"]
    B["<b>5. Apache Site or .htaccess settings</b><br/>User and client based restrictions"]
    C["<b>4. Apache Addond like mod_evasive </b><br/>Service abuse control / Service level access<br/>Require ip"]
    D["<b>3. Apache Global settings</b><br/>ServerSignature Off, ServerTokens Prod"]
    E["<b>2. Network</b><br/>UFW / Fail2ban<br/>Require ip 172.17.0.0/16, 172.18.0.0/16, 172.26.0.0/16"]
    F["<b>1. Host</b><br/>SSH hardening<br/>PasswordAuthentication no"]
    A --> B --> C --> D --> E --> F
Lets begain with the Apache2 hardening. You have done WordPress hardening with plugins before.
Launch nano
Edit or add the following lines
Hardening of Directory configuration according to general practice. “Note that the default access for
AllowOverride None Disables .htaccess processing in this scope. User can not add other settings using htaccess file. Also scary in consept of wordpress that has most of security built on top of it.
Require all denied Denies access to everything by default at this scope. Need to enable in other files or confs
An example of hardening using ip and turning off the listing of folder contents
<Directory /var/www/html>
    Options -Indexes +FollowSymLinks
    <RequireAll>
        Require ip 172.17.0.0/16
        Require ip 172.18.0.0/16
        Require ip 172.26.0.0/16
        # Before using these ranges, verify your client IP or upstream network hop.
    </RequireAll>
</Directory>
/etc/apache2/sites-enabled/000-default.conf is often minimal. Keep global hardening in /etc/apache2/apache2.conf and finetune it inside /etc/apache2/sites-enabled/000-default.
Does the service provider allow which settings to harden or use?
In all situations, you don't have the possibility to edit Apache's definitions (Virtual host), so you easily assume that you make the restrictions with .htaccess. Not all service providers always use this either.
“ When this directive is set to None and AllowOverrideList is set to None, .htaccess files are completely ignored. In this case, the server will not even attempt to read .htaccess files in the filesystem.
When this directive is set to All, then any directive which has the .htaccess Context is allowed in .htaccess files. “
Check your own settings with WordPress Security Scan
https://hackertarget.com/wordpress-security-scan/
Fail2Ban
Since we are now in a cloud environment, the contact IPs are unique for each of us. If you want to test your own service, try HAMK VDI or from your own computer, depending on which one you normally work from. More on this in classes.
Let's install Fail2Ban
Let's take a look at the basic settings. If you edit the settings here, they will be overwritten when the package definition file is updated by the publisher.
# Changes:  in most of the cases you should not modify this
# file, but provide customizations in jail.local file,
# or separate .conf files under jail.d/ directory, e.g.:

Bantime 600 → 60
findtime  600 → 60
maxretry = 5 → 3
Providing customizations in jail.local file
sudo cp /etc/fail2ban/jail.d/defaults-debian.conf /etc/fail2ban/jail.d/defaults-debian.local
sudo nano /etc/fail2ban/jail.d/defaults-debian.local
Let's start Fail2ban
We log in to the ssh service with wrong credentials 5 times, after which Fail2ban blocks us. Do this from a VDI machine or from your own home computer!
assdasdas@OmaIP
Let's check the blocking using the Console connection
OR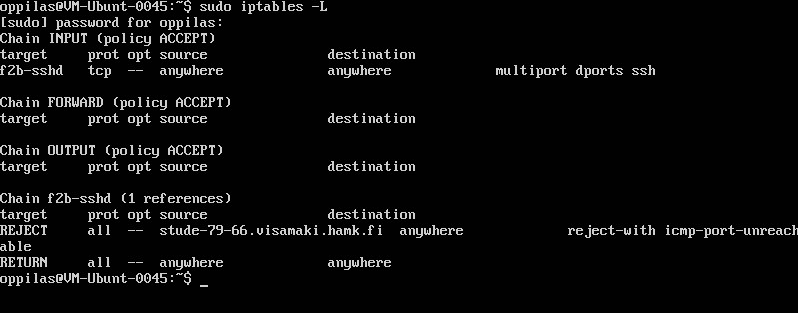
Let's unblock the IP address
Manual ip release
Manual release of ip address
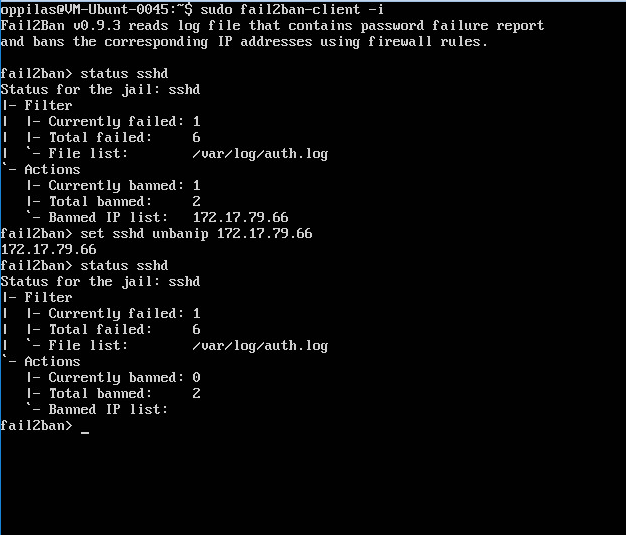
Your connection is now open
Suggested rules for your own use (Assuming that you use this at home and you have 192.168.1.x space)
[sshd]
enabled  = true
ignoreip = 127.0.0.1 192.168.1.0/24
maxretry = 3
bantimes = 600
findtime = 600


[apache-badbots]

enabled  = true
ignoreip = 127.0.0.1 192.168.1.0/24
port     = http,https
filter   = apache-badbots
logpath  = /var/log/apache*/*error.log
maxretry = 2


[apache]

enabled  = true
ignoreip = 127.0.0.1 192.168.1.0/24
port     = http,https
filter   = apache-auth
logpath  = /var/log/apache*/*error.log
maxretry = 6
The ease of life,Show status of all fail2ban jails at once : https://gist.github.com/kamermans/1076290